
This article is 10 years old
The content here might be outdated as technology and best practices evolve quickly. While the concepts may still be valuable, please verify the information against current documentation and standards.
TouchID authentication tutorial for Swift
TouchID
A few years ago Apple introduced TouchID on the iPhone 5S. Instead of asking your user for a password, you can just ask for their fingerprint (if their device has TouchID) which improves the UX by a gazillion times.
With the introduction of iOS7, it was impossible for a developer to use the fingerprint sensor for authentication. Luckily in iOS8, Apple provided us with an API to do so.
In this tutorial I’ll show you how you can integrate TouchID authentication in your application.
Local Authentication framework
If you want to work with TouchID, you’ll have to link your app with the Local Authentication framework.
Go to Project Settings > General and scroll down to the Linked Frameworks and Libraries section. Click on the + sign and add LocalAuthentication.framework.

Link the LocalAuthentication.framework with your app
Authentication view controller
For this example we’ll just show the user a screen with a login button. If the user touched the login button, he will be asked to authenticate via TouchID. If the authentication fails, we’ll show an error message. If it succeeds we’ll push a new view controller onto the navigation stack.
My Storyboard looks like this hierarchical:
- UINavigationController: root view controller
-
AuthenticationViewController
- UIButton : login
-
ProtectedContentViewController
- UILabel : success message
-
I’ve added an IBAction in my AuthenticationViewController, and hooked it up to the UIButton.
First you’ll need to import the Local Authentication framework at the top of the AuthenticationViewController.
import LocalAuthenticationSwift
The Local Authentication framework is quite small for Apple standards. It only has one class named LAContext.
First we need to create an authentication context. You do this by creating an instance of the LAContext class.
@IBAction func loginButtonClicked(sender: UIButton) {

   // 1. Create a authentication context
   let authenticationContext = LAContext()

   ...

}
Swift
Because not every device has a TouchID sensor, we need to ask the context if there is a fingerprint sensor.
Check for TouchID availability
You do this by calling the method canEvaluatePolicy:error. This method will return a boolean which you can use to provide a fallback authentication method if there is no TouchID available.
var error:NSError?

// 2. Check if the device has a fingerprint sensor
// If not, show the user an alert view and bail out!
guard authenticationContext.canEvaluatePolicy(.DeviceOwnerAuthenticationWithBiometrics, error: &error) else {

   showAlertViewIfNoBiometricSensorHasBeenDetected()
   return

}
Swift
I use the guard statement here introduced in Swift 2, because this method needs to return true, otherwise there is no point of executing the rest of the method. For now, I’ll just present the user with an UIAlertViewController to give some feedback.
func showAlertViewIfNoBiometricSensorHasBeenDetected(){

   showAlertWithTitle("Error", message: "This device does not have a TouchID sensor.")

}

func showAlertWithTitle( title:String, message:String ) {

    let alertVC = UIAlertController(title: title, message: message, preferredStyle: .Alert)

    let okAction = UIAlertAction(title: "Ok", style: .Default, handler: nil)
    alertVC.addAction(okAction)

    dispatch_async(dispatch_get_main_queue()) { () -> Void in

        self.presentViewController(alertVC, animated: true, completion: nil)

    }

}
Swift
Validating the fingerprint
If the device does have a TouchID sensor, we want to present the user the typical TouchID form.
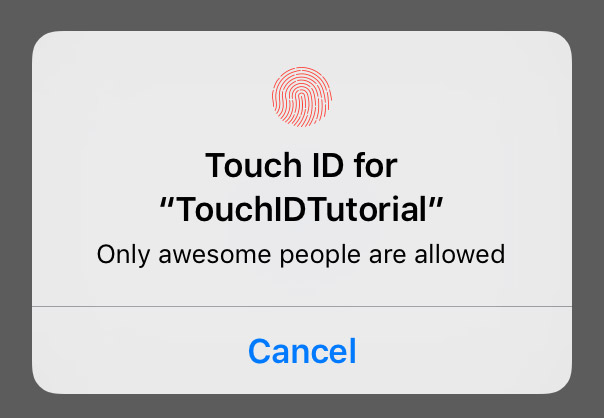
TouchID form
This popup is shown when you call the evaluatePolicy:localizedReason:reply: method on your authentication context.
This method has 3 arguments:
-
policy: the policy to evaluate
-
localizedReason: a string message that will be shown to the user, explaining why they need to provide their fingerprint
-
reply: a closure which is executed when the evaluation ends. This closure has 2 arguments
-
success: true if fingerprint is recognized, false if not
-
error: a NSError object with an error code (check LAError for all options)
-
This is my implementation.
// 3. Check the fingerprint
authenticationContext.evaluatePolicy(
    .DeviceOwnerAuthenticationWithBiometrics,
    localizedReason: "Only awesome people are allowed",
    reply: { [unowned self] (success, error) -> Void in

    if( success ) {

        // Fingerprint recognized
        // Go to view controller
        self.navigateToAuthenticatedViewController()

    }else {

        // Check if there is an error
        if let error = error {

            let message = self.errorMessageForLAErrorCode(error.code)
            self.showAlertViewAfterEvaluatingPolicyWithMessage(message)

        }

    }

})
Swift
Handling success
The method navigateToAuthenticatedViewController just gets a view controller in my Storyboard and performs a pushViewController on the navigation controller.
func navigateToAuthenticatedViewController(){

    if let loggedInVC = storyboard?.instantiateViewControllerWithIdentifier("LoggedInViewController") {

        dispatch_async(dispatch_get_main_queue()) { () -> Void in

            navigationController?.pushViewController(loggedInVC, animated: true)

        }

    }

}
Swift
Handling failure
If there is an error, I have a method which returns an error message based on the error code. The error codes can be compared to the LAError class.
func errorMessageForLAErrorCode( errorCode:Int ) -> String{

    var message = ""

    switch errorCode {

    case LAError.AppCancel.rawValue:
        message = "Authentication was cancelled by application"

    case LAError.AuthenticationFailed.rawValue:
        message = "The user failed to provide valid credentials"

    case LAError.InvalidContext.rawValue:
        message = "The context is invalid"

    case LAError.PasscodeNotSet.rawValue:
        message = "Passcode is not set on the device"

    case LAError.SystemCancel.rawValue:
        message = "Authentication was cancelled by the system"

    case LAError.TouchIDLockout.rawValue:
        message = "Too many failed attempts."

    case LAError.TouchIDNotAvailable.rawValue:
        message = "TouchID is not available on the device"

    case LAError.UserCancel.rawValue:
        message = "The user did cancel"

    case LAError.UserFallback.rawValue:
        message = "The user chose to use the fallback"

    default:
        message = "Did not find error code on LAError object"

    }

    return message

}
Swift
And that’s it.
Source code
The source code for this project can be found on GitHub.

About the Author
👋 Hi, I'm Frederik Jacques, a passionate iOS developer and entrepreneur with over a decade of experience building innovative mobile applications.
I love creating apps that solve real problems and bring joy to users. From educational tools to creative meme makers, I'm always exploring new ways to blend technology with user experience. When I'm not coding, you'll find me sharing insights about iOS development, app monetization, and the indie developer journey.